ISTRUZIONI PER LA POSA A
1) PREPARAZIONE DEL SOTTOFONDO
• La posa su ghiaia permette di pavimentare in assenza di un
supporto di cemento.
• Predisporre un cordolo, elemento di contenimento, sul
perimetro della superficie destinata alla pavimentazione con
una bordatura per assicurare una buona tenuta.
• Asportare uno spessore di terreno: valutare il tipo di terreno
di supporto in modo da definire la profondità di rimozione,
indicativamente dai 10 ai 20 cm (terreno poco deformabile,
terreno deformabile).
• Livellare il fondo il più possibile aiutandosi con un rastrello,
un righello e una livella.
• Spianare e rassodare il terreno per una migliore stabilità della
pavimentazione
• Disporre sul fondo un velo di tessuto non tessuto per bloccare
la vegetazione.
• Stendere uno strato di ghiaia a granulometria mista
(16-35 mm) per uno spessore di circa 10 cm per consentire
il deflusso delle acque piovane.
• Eseguire un compattamento energico del sottofondo che deve
possedere una pendenza di almeno il 2% per assicurare un
corretto drenaggio.
2) LETTO DI POSA
• Per la posa su ghiaia realizzare un letto di ghiaia della
granulometria di 4-8 mm per uno spessore di almeno 10 cm
e livellarlo adeguatamente.
La planarita’ del letto di posa deve essere garantita durante
tutti i lavori di cantiere.
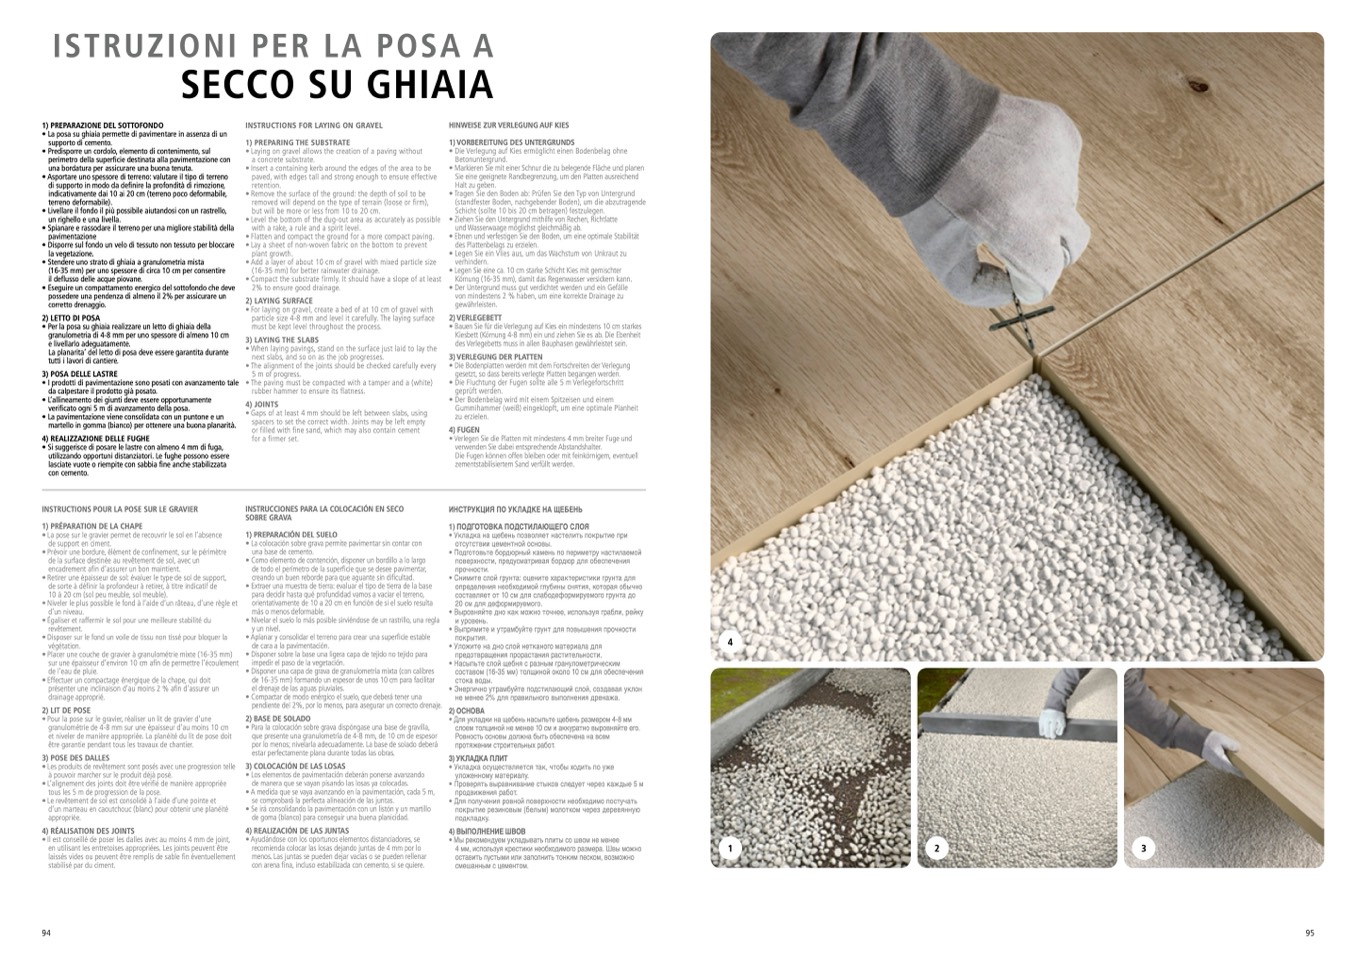
3) POSA DELLE LASTRE
• I prodotti di pavimentazione sono posati con avanzamento tale
da calpestare il prodotto già posato.
• L’allineamento dei giunti deve essere opportunamente
verificato ogni 5 m di avanzamento della posa.
• La pavimentazione viene consolidata con un puntone e un
martello in gomma (bianco) per ottenere una buona planarità.
4) REALIZZAZIONE DELLE FUGHE
• Si suggerisce di posare le lastre con almeno 4 mm di fuga,
utilizzando opportuni distanziatori. Le fughe possono essere
lasciate vuote o riempite con sabbia fine anche stabilizzata
con cemento.
INSTRUCTIONS POUR LA POSE SUR LE GRAVIER
1) PRÉPARATION DE LA CHAPE
• La pose sur le gravier permet de recouvrir le sol en l’absence
de support en ciment.
• Prévoir une bordure, élément de confinement, sur le périmètre
de la surface destinée au revêtement de sol, avec un
encadrement afin d’assurer un bon maintient.
• Retirer une épaisseur de sol: évaluer le type de sol de support,
de sorte à définir la profondeur à retirer, à titre indicatif de
10 à 20 cm (sol peu meuble, sol meuble).
• Niveler le plus possible le fond à l’aide d’un râteau, d’une règle et
d’un niveau.
• Égaliser et raffermir le sol pour une meilleure stabilité du
revêtement.
• Disposer sur le fond un voile de tissu non tissé pour bloquer la
végétation.
• Placer une couche de gravier à granulométrie mixte (16-35 mm)
sur une épaisseur d’environ 10 cm afin de permettre l’écoulement
de l’eau de pluie.
• Effectuer un compactage énergique de la chape, qui doit
présenter une inclinaison d’au moins 2 % afin d’assurer un
drainage approprié.
2) LIT DE POSE
• Pour la pose sur le gravier, réaliser un lit de gravier d’une
granulométrie de 4-8 mm sur une épaisseur d’au moins 10 cm
et niveler de manière appropriée. La planéité du lit de pose doit
être garantie pendant tous les travaux de chantier.
3) POSE DES DALLES
• Les produits de revêtement sont posés avec une progression telle
à pouvoir marcher sur le produit déjà posé.
• L’alignement des joints doit être vérifié de manière appropriée
tous les 5 m de progression de la pose.
• Le revêtement de sol est consolidé à l’aide d’une pointe et
d’un marteau en caoutchouc (blanc) pour obtenir une plan
éité
appropriée.
4) RÉALISATION DES JOINTS
• Il est conseillé de poser les dalles avec au moins 4 mm de joint,
en utilisant les entretoises appropriées. Les joints peuvent
être
laissés vides ou peuvent être remplis de sable fin éventuellement
stabilisé par du ciment.
INSTRUCTIONS FOR LAYING ON GRAVEL
1) PREPARING THE SUBSTRATE
• Laying on gravel allows the creation of a paving without
a concrete substrate.
• Insert a containing kerb around the edges of the area to be
paved, with edges tall and strong enough to ensure effective
retention.
• Remove the surface of the ground: the depth of soil to be
removed will depend on the type of terrain (loose or firm),
but will be more or less from 10 to 20 cm.
• Level the bottom of the dug-out area as accurately as possible
with a rake, a rule and a spirit level.
• Flatten and compact the ground for a more compact paving.
• Lay a sheet of non-woven fabric on the bottom to prevent
plant growth.
• Add a layer of about 10 cm of gravel with mixed particle size
(16-35 mm) for better rainwater drainage.
• Compact the substrate firmly. It should have a slope of at least
2% to ensure good drainage.
2) LAYING SURFACE
• For laying on gravel, create a bed of at 10 cm of gravel with
particle size 4-8 mm and level it carefully. The laying surface
must be kept level throughout the process.
3) LAYING THE SLABS
• When laying pavings, stand on the surface just laid to lay the
next slabs, and so on as the job progresses.
• The alignment of the joints should be checked carefully every
5 m of progress.
• The paving must be compacted with a tamper and a (white)
rubber hammer to ensure its flatness.
4) JOINTS
• Gaps of at least 4 mm should be left between slabs, using
spacers to set the correct width. Joints may be left empty
or filled with fine sand, which may also contain cement
for a firmer set.
INSTRUCCIONES PARA LA COLOCACIÓN EN SECO
SOBRE GRAVA
1) PREPARACIÓN DEL SUELO
• La colocación sobre grava permite pavimentar sin contar con
una base de cemento.
• Como elemento de contención, disponer un bordillo a lo largo
de todo el perímetro de la superficie que se desee pavimentar,
creando un buen reborde para que aguante sin dificultad.
• Extraer una muestra de tierra: evaluar el tipo de tierra de la base
para decidir hasta qué profundidad vamos a vaciar el terreno,
orientativamente de 10 a 20 cm en función de si el suelo resulta
más o menos deformable.
• Nivelar el suelo lo más posible sirviéndose de un rastrillo, una regla
y un nivel.
• Aplanar y consolidar el terreno para crear una superficie estable
de cara a la pavimentación.
• Disponer sobre la base una ligera capa de tejido no tejido para
impedir el paso de la vegetación.
• Disponer una capa de grava de granulometría mixta (con calibres
de 16-35 mm) formando un espesor de unos 10 cm para facilitar
el drenaje de las aguas pluviales.
• Compactar de modo enérgico el suelo, que deberá tener una
pendiente del 2%, por lo menos, para asegurar un correcto drenaje.
2) BASE DE SOLADO
• Para la colocación sobre grava dispóngase una base de gravilla,
que presente una granulometría de 4-8 mm, de 10 cm de espesor
por lo menos; nivelarla adecuadamente. La base de solado deberá
estar perfectamente plana durante todas las obras.
3) COLOCACIÓN DE LAS LOSAS
• Los elementos de pavimentación deberán ponerse avanzando
de manera que se vayan pisando las losas ya colocadas.
• A medida que se vaya avanzando en la pavimentación, cada 5 m,
se comprobará la perfecta alineación de las juntas.
• Se irá consolidando la pavimentación con un listón y un martillo
de goma (blanco) para conseguir una buena planicidad.
4) REALIZACIÓN DE LAS JUNTAS
• Ayudándose con los oportunos elementos distanciadores, se
recomienda colocar las losas dejando juntas de 4 mm por lo
menos. Las juntas se pueden dejar vacías o se pueden rellenar
con arena fina, incluso estabilizada con cemento, si se quiere.
HINWEISE ZUR VERLEGUNG AUF KIES
1) VORBEREITUNG DES UNTERGRUNDS
• Die Verlegung auf Kies ermöglicht einen Bodenbelag ohne
Betonuntergrund.
• Markieren Sie mit einer Schnur die zu belegende Fläche und planen
Sie eine geeignete Randbegrenzung, um den Platten ausreichend
Halt zu geben.
• Tragen Sie den Boden ab: Prüfen Sie den Typ von Untergrund
(standfester Boden, nachgebender Boden), um die abzutragende
Schicht (sollte 10 bis 20 cm betragen) festzulegen.
• Ziehen Sie den Untergrund mithilfe von Rechen, Richtlatte
und Wasserwaage möglichst gleichmäßig ab.
• Ebnen und verfestigen Sie den Boden, um eine optimale Stabilität
des Plattenbelags zu erzielen.
• Legen Sie ein Vlies aus, um das Wachstum von Unkraut zu
verhindern.
• Legen Sie eine ca. 10 cm starke Schicht Kies mit gemischter
Körnung (16-35 mm), damit das Regenwasser versickern kann.
• Der Untergrund muss gut verdichtet werden und ein Gefälle
von mindestens 2 % haben, um eine korrekte Drainage zu
gewährleisten.
2) VERLEGEBETT
• Bauen Sie für die Verlegung auf Kies ein mindestens 10 cm starkes
Kiesbett (Körnung 4-8 mm) ein und ziehen Sie es ab. Die Ebenheit
des Verlegebetts muss in allen Bauphasen gewährleistet sein.
3) VERLEGUNG DER PLATTEN
• Die Bodenplatten werden mit dem Fortschreiten der Verlegung
gesetzt, so dass bereits verlegte Platten begangen werden.
• Die Fluchtung der Fugen sollte alle 5 m Verlegefortschritt
geprüft werden.
• Der Bodenbelag wird mit einem Spitzeisen und einem
Gummihammer (weiß) eingeklopft, um eine optimale Planheit
zu erzielen.
4) FUGEN
• Verlegen Sie die Platten mit mindestens 4 mm breiter Fuge und
verwenden Sie dabei entsprechende Abstandshalter.
Die Fugen können offen bleiben oder mit feinkörnigem, eventuell
zementstabilisiertem Sand verfüllt werden.
ИНСТРУКЦИЯ ПО УКЛАДКЕ НА ЩЕБЕНЬ
1) ПОДГОТОВКА ПОДСТИЛАЮЩЕГО СЛОЯ
• Укладка на щебень позволяет настелить покрытие при
отсутствии цементной основы.
• Подготовьте бордюрный камень по периметру настилаемой
поверхности, предусматривая бордюр для обеспечения
прочности.
• Снимите слой грунта: оцените характеристики грунта для
определения необходимой глубины снятия, которая обычно
составляет от 10 см для слабодеформируемого грунта до
20 см для деформируемого.
• Выровняйте дно как можно точнее, используя грабли, рейку
и уровень.
• Выпрямите и утрамбуйте грунт для повышения прочности
покрытия.
• Уложите на дно слой нетканого материала для
предотвращения прорастания растительности.
• Насыпьте слой щебня с разным гранулометрическим
составом (16-35 мм) толщиной около 10 см для обеспечения
стока воды.
• Энергично утрамбуйте подстилающий слой, создавая уклон
не менее 2% для правильного выполнения дренажа.
2) ОСНОВА
• Для укладки на щебень насыпьте щебень размером 4-8 мм
слоем толщиной не менее 10 см и аккуратно выровняйте его.
Ровность основы должна быть обеспечена на всем
протяжении строительных работ.
3) УКЛАДКА ПЛИТ
• Укладка осуществляется так, чтобы ходить по уже
уложенному материалу.
• Проверять выравнивание стыков следует через каждые 5 м
продвижения работ.
• Для получения ровной поверхности необходимо постучать
покрытие резиновым (белым) молотком через деревянную
подкладку.
4) ВЫПОЛНЕНИЕ ШВОВ
• Мы рекомендуем укладывать плиты со швом не менее
4 мм, используя крестики необходимого размера. Швы можно
оставить пустыми или заполнить тонким песком, возможно
смешанным с цементом.
4
SECCO SU GHIAIA
94
95
1
2
3

