aks_2019
252
253
Living shower
aks_2019
10 step per misurare il box doccia
10 regole per misurare il piatto doccia
How to measure your shower tray in 10 steps
How to measure your shower enclosure in 10 steps
Cosa serve /
What you
need
Come fare /
How to clean
the glass
+
+
+
Step 1
Verificare lo stato di avanzamento dei lavori. Se la posa
del piatto e delle piastrelle non è terminata, è meglio non
eseguire il rilievo.
Check the progress of the work on the shower. If the tray
and tiling have not been fully laid yet, wait before taking the
measurements.
Step 2
Controllare sempre quale sia la misura richiesta (esterno
o interno bordo). In caso di dubbio rilevare ed indicare
entrambe le misure.
*Se viene richiesto un rilievo sull’interno del bordo tenere
presente che se viene commissionato il box sull’esterno,
NON viene garantita la sua tenuta.
*Per bordo interno si intende la distanza dal muro fino al
primo appoggio utile sul bordo del piatto, al di là delle
“curvette” angolari. NON si intende la dimensione dell’invaso
del piatto.
Always check which measurement is required (internal or
external edge). If in doubt, measure and specify both.
*If the inside edge measurement is requested, bear in mind
that if the enclosure is ordered for the outside edge,
the seal is NOT guaranteed to be watertight.
*The internal edge is understood to mean the distance from
the wall, up to where you first touch the edge of the tray,
beyond the corner curves. It does NOT mean the size of
the tray cutout.
Step 3
Verificare che il piatto doccia o il piano d’appoggio della
cabina sia in appoggio in entrambi i sensi (longitudinale e
latitudinale). Segnalare eventuali pendenze.
Check that the shower tray, or the surface the enclosure will be
installed on, is properly resting in position both lengthways and
widthways. Make a note of any incline. *Sometimes, ceramic trays
are convex. If this is the case, please also make a note of this.
Step 4
Verificare la bolla dei muri su cui si appoggerà la cabina.
Segnalare eventuali anomalie.
Check that the walls where the enclosure will be installed are
level. Make a note of any irregularities.
Step 5
Identificare e segnalare eventuali particolarità (presenza di
porte a scrigno, muri in cartongesso, rivestimenti di altezza
ridotta, cambi di profondità o di altezza dei rivestimenti, stipiti
di porte che montano sopra al bordo del piatto, ecc.)
Identify and make a note of any specific features in the shower
area (concealed sliding doors, plasterboard walls, low cladding,
changes in cladding depth/height, door jambs fitted above the
shower tray edge, etc.).
L
B
Step 6
fig.1
Verificare la presenza di eventuali impediment
(mobili, sanitari, ecc.) sul lato dell’apertura della cabina.
Nel caso di anta battente, misurare le dimensioni e le
distanze dal piatto doccia.
Check if there is anything blocking the enclosure door from
opening (units, bathroom fixtures, etc.). If the door is hinged,
measure the door size and the distance from the shower tray.
Step 7
Per maggiore sicurezza, fotografare la zona doccia che si
vuole allestire.
*In presenza di muretti che sormontano il bordo o stipiti che
entrano sullo stesso, fotografare anche il dettaglio.
Take photographs of the shower area being fitted, to cover all
eventualities.
*Where there is brickwork above the edge or the jamb overlaps
the wall, take a photograph.
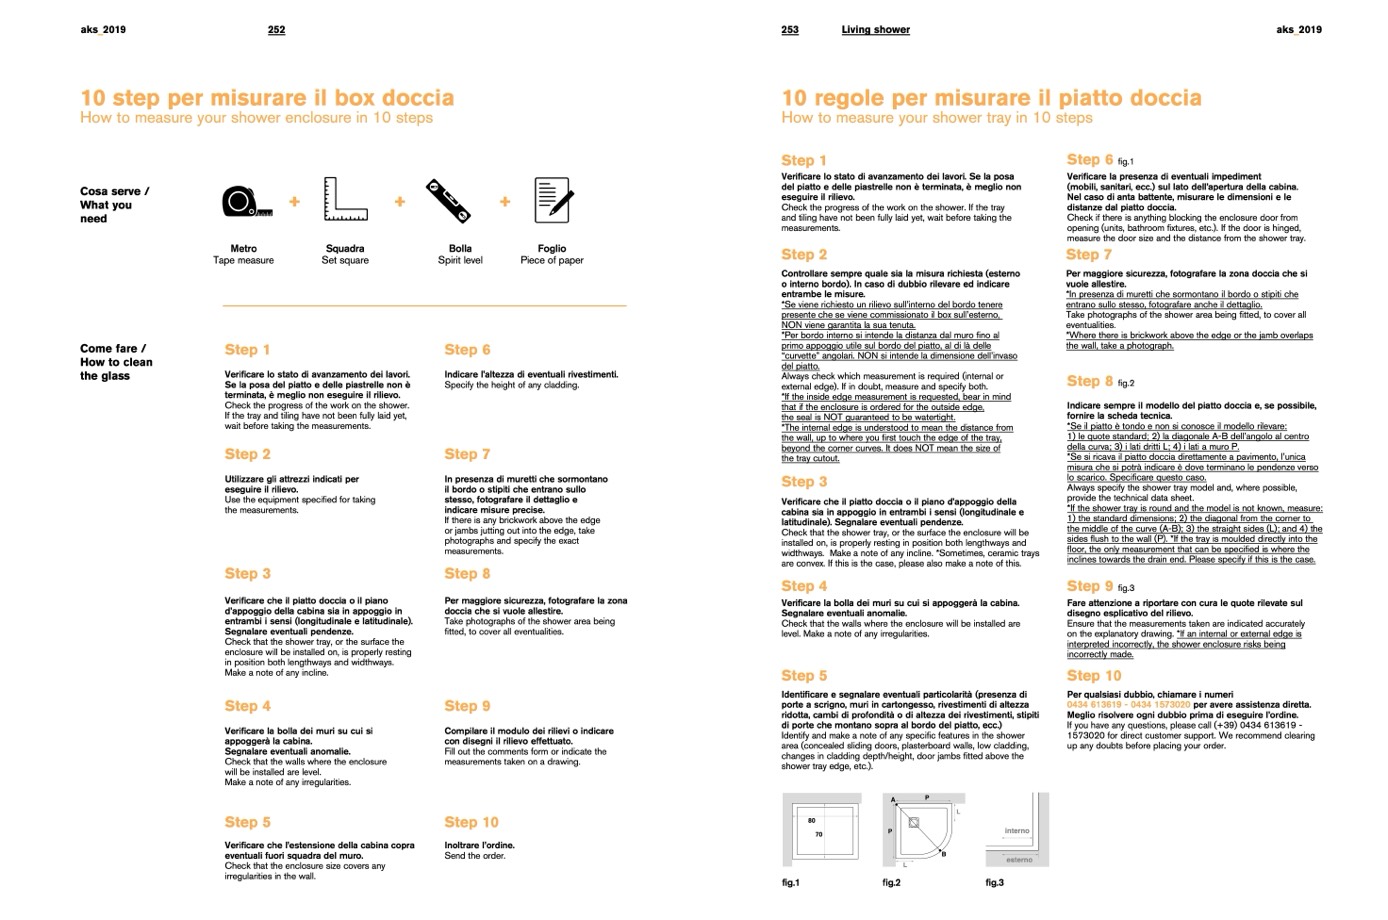
Step 8
fig.2
Indicare sempre il modello del piatto doccia e, se possibile,
fornire la scheda tecnica.
*Se il piatto è tondo e non si conosce il modello rilevare:
1) le quote standard; 2) la diagonale A-B dell’angolo al centro
della curva; 3) i lati dritti L; 4) i lati a muro P.
*Se si ricava il piatto doccia direttamente a pavimento, l’unica
misura che si potrà indicare è dove terminano le pendenze verso
lo scarico. Specificare questo caso.
Always specify the shower tray model and, where possible,
provide the technical data sheet.
*If the shower tray is round and the model is not known, measure:
1) the standard dimensions; 2) the diagonal from the corner to
the middle of the curve (A-B); 3) the straight sides (L); and 4) the
sides flush to the wall (P). *If the tray is moulded directly into the
floor, the only measurement that can be specified is where the
inclines towards the drain end. Please specify if this is the case.
Step 9
fig.3
Fare attenzione a riportare con cura le quote rilevate sul
disegno esplicativo del rilievo.
Ensure that the measurements taken are indicated accurately
on the explanatory drawing. *If an internal or external edge is
interpreted incorrectly, the shower enclosure risks being
incorrectly made.
Step 10
Per qualsiasi dubbio, chiamare i numeri
0434 613619 - 0434 1573020 per avere assistenza diretta.
Meglio risolvere ogni dubbio prima di eseguire l’ordine.
If you have any questions, please call (+39) 0434 613619 -
1573020 for direct customer support. We recommend clearing
up any doubts before placing your order.
Metro
Tape measure
Step 1
Squadra
Set square
Bolla
Spirit level
Step 6
Foglio
Piece of paper
Verificare lo stato di avanzamento dei lavori.
Se la posa del piatto e delle piastrelle non è
terminata, è meglio non eseguire il rilievo.
Check the progress of the work on the shower.
If the tray and tiling have not been fully laid yet,
wait before taking the measurements.
Step 2
Utilizzare gli attrezzi indicati per
eseguire il rilievo.
Use the equipment specified for taking
the measurements.
Step 3
Verificare che il piatto doccia o il piano
d’appoggio della cabina sia in appoggio in
entrambi i sensi (longitudinale e latitudinale).
Segnalare eventuali pendenze.
Check that the shower tray, or the surface the
enclosure will be installed on, is properly resting
in position both lengthways and widthways.
Make a note of any incline.
Step 4
Verificare la bolla dei muri su cui si
appoggerà la cabina.
Segnalare eventuali anomalie.
Check that the walls where the enclosure
will be installed are level.
Make a note of any irregularities.
Step 5
Verificare che l’estensione della cabina copra
eventuali fuori squadra del muro.
Check that the enclosure size covers any
irregularities in the wall.
Indicare l’altezza di eventuali rivestimenti.
Specify the height of any cladding.
Step 7
In presenza di muretti che sormontano
il bordo o stipiti che entrano sullo
stesso, fotografare il dettaglio e
indicare misure precise.
If there is any brickwork above the edge
or jambs jutting out into the edge, take
photographs and specify the exact
measurements.
Step 8
Per maggiore sicurezza, fotografare la zona
doccia che si vuole allestire.
Take photographs of the shower area being
fitted, to cover all eventualities.
Step 9
Compilare il modulo dei rilievi o indicare
con disegni il rilievo effettuato.
Fill out the comments form or indicate the
measurements taken on a drawing.
Step 10
Inoltrare l’ordine.
Send the order.
L
A
P
80
70
esterno
fig.1
fig.2
fig.3
interno

