Steam traps
Inverted bucket
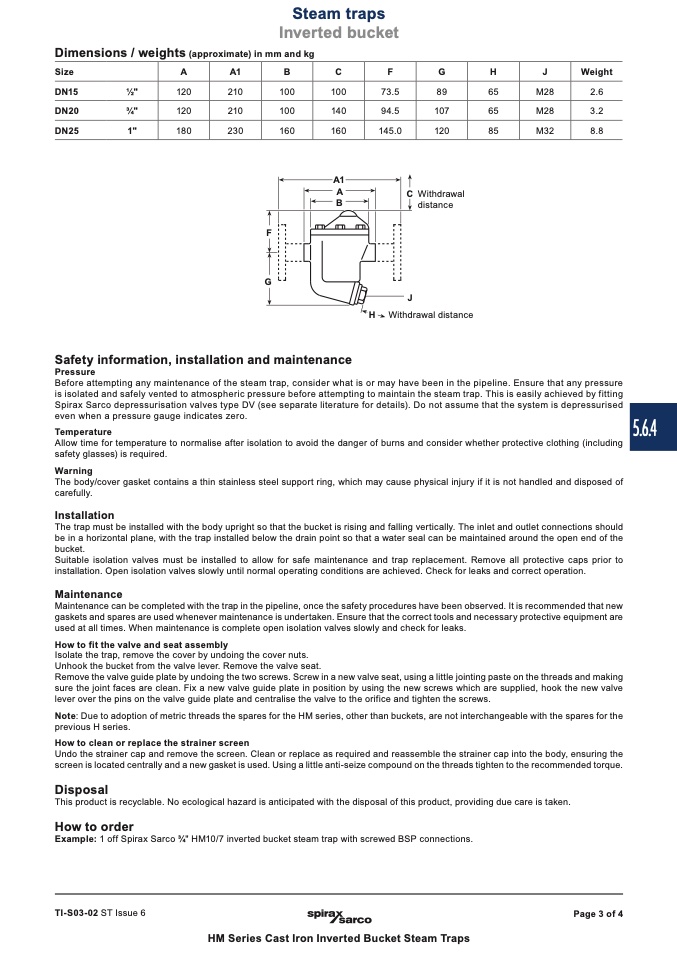
Dimensions / weights (approximate) in mm and kg
Size
DN15
1⁄2"
DN20
3⁄4"
DN25
1"
Weight
2.6
3.2
8.8
A A1 B
C
F G
H
J
120 210 100
100 73.5 89
65 M28
120 210 100
140
94.5 107
65
M28
180 230 160
160 145.0 120
85 M32
A1
A
B
C Withdrawal
distance
J
Withdrawal distance
F
G
H
Safety information, installation and maintenance
Pressure
Before attempting any maintenance of the steam trap, consider what is or may have been in the pipeline. Ensure that any pressure
is isolated and safely vented to atmospheric pressure before attempting to maintain the steam trap. This is easily achieved by fitting
Spirax Sarco depressurisation valves type DV (see separate literature for details). Do not assume that the system is depressurised
even when a pressure gauge indicates zero.
Temperature
Allow time for temperature to normalise after isolation to avoid the danger of burns and consider whether protective clothing (including
safety glasses) is required.
Warning
The body/cover gasket contains a thin stainless steel support ring, which may cause physical injury if it is not handled and disposed of
carefully.
Installation
The trap must be installed with the body upright so that the bucket is rising and falling vertically. The inlet and outlet connections should
be in a horizontal plane, with the trap installed below the drain point so that a water seal can be maintained around the open end of the
bucket.
Suitable isolation valves must be installed to allow for safe maintenance and trap replacement. Remove all protective caps prior to
installation. Open isolation valves slowly until normal operating conditions are achieved. Check for leaks and correct operation.
Maintenance
Maintenance can be completed with the trap in the pipeline, once the safety procedures have been observed. It is recommended that new
gaskets and spares are used whenever maintenance is undertaken. Ensure that the correct tools and necessary protective equipment are
used at all times. When maintenance is complete open isolation valves slowly and check for leaks.
How to fit the valve and seat assembly
Isolate the trap, remove the cover by undoing the cover nuts.
Unhook the bucket from the valve lever. Remove the valve seat.
Remove the valve guide plate by undoing the two screws. Screw in a new valve seat, using a little jointing paste on the threads and making
sure the joint faces are clean. Fix a new valve guide plate in position by using the new screws which are supplied, hook the new valve
lever over the pins on the valve guide plate and centralise the valve to the orifice and tighten the screws.
Note: Due to adoption of metric threads the spares for the HM series, other than buckets, are not interchangeable with the spares for the
previous H series.
How to clean or replace the strainer screen
Undo the strainer cap and remove the screen. Clean or replace as required and reassemble the strainer cap into the body, ensuring the
screen is located centrally and a new gasket is used. Using a little anti-seize compound on the threads tighten to the recommended torque.
Disposal
This product is recyclable. No ecological hazard is anticipated with the disposal of this product, providing due care is taken.
How to order
Example: 1 off Spirax Sarco 3⁄4" HM10/7 inverted bucket steam trap with screwed BSP connections.
TI-S03-02 ST Issue 6
Page 3 of 4
HM Series Cast Iron Inverted Bucket Steam Traps
5.6.4

