MODALITÀ DI POSA
POSA IN ADERENZA
• Mediante velcro: adatto per pareti e soffitti
1. Verificare prima della posa che il piano di posa scelto sia
idoneo.
2. Tracciare l’area di posizionamento del pannello.
3. Tagliare il velcro in strisce, rimuovere la pellicola e fissare
la parte adesiva all’interno dell’area tracciata. Fissare le
strisce di velcro con dei punti metallici o dei chiodi a testa
larga (ogni 20 cm). Per la posa a soffitto fissare ulterior-
mente il pannello con dei punti di silicone neutro.
4. Posizionare il pannello facendolo aderire il retro al velcro.
Una volta posizionato correttamente, fare pressione sul
pannello per assicurarne la tenuta.
• Mediante colla: adatto per pareti e soffitti
Colla a base di gesso per un’adesione permanente tra sup-
porto e pannello.
POSA IN SOSPENSIONE
• Posa a baffle
Sospensione a soffitto del pannello EVOLUTION SILENT in
verticale, perpendicolarmente al soffitto. Posa da applicare
tramite il kit per pendinatura a baffle e l’idoneo supporto a
soffitto (tassello non incluso).
1. Avvitare i supporti a soffitto rispettando gli interassi.
2. Realizzare un’isola all’estremità libera del cavo mediante il
nottolino fermacavo, regolandone la lunghezza in funzio-
ne della distanza dal soffitto.
3. Recidere la parte di cavo eccedente con un tronchesino.
4. Appendere il pannello ai supporti a soffitto tramite l’isola
realizzata con il nettolino.
• Posa a isola
Sospensione a soffitto del pannello EVOLUTION SILENT in
orizzontale, parallelo o inclinato rispetto al soffitto. Posa da
applicare tramite il kit per pendinatura a isola e l’idoneo sup-
porto a soffitto (tassello non incluso).
1. Avvitare i supporti a soffitto, rispettando gli interassi.
2. Inserire e avvitare i ganci a spirale sul retro del pannello
nella parte non lisciata/non stampata.
3. Inserire l’isola del cavo in acciaio zincato nel gancio a spi-
rale.
4. Realizzare un’isola all’estremità libera del cavo mediante
il nottolino fermacavo, regolandone la lunghezza in fun-
zione della distanza dal soffitto.
5. Recidere la parte di cavo eccedente con un tronchesino.
6. Appendere il pannello ai supporti a so
ffitto tramite l’isola
realizzata con il nettolino.
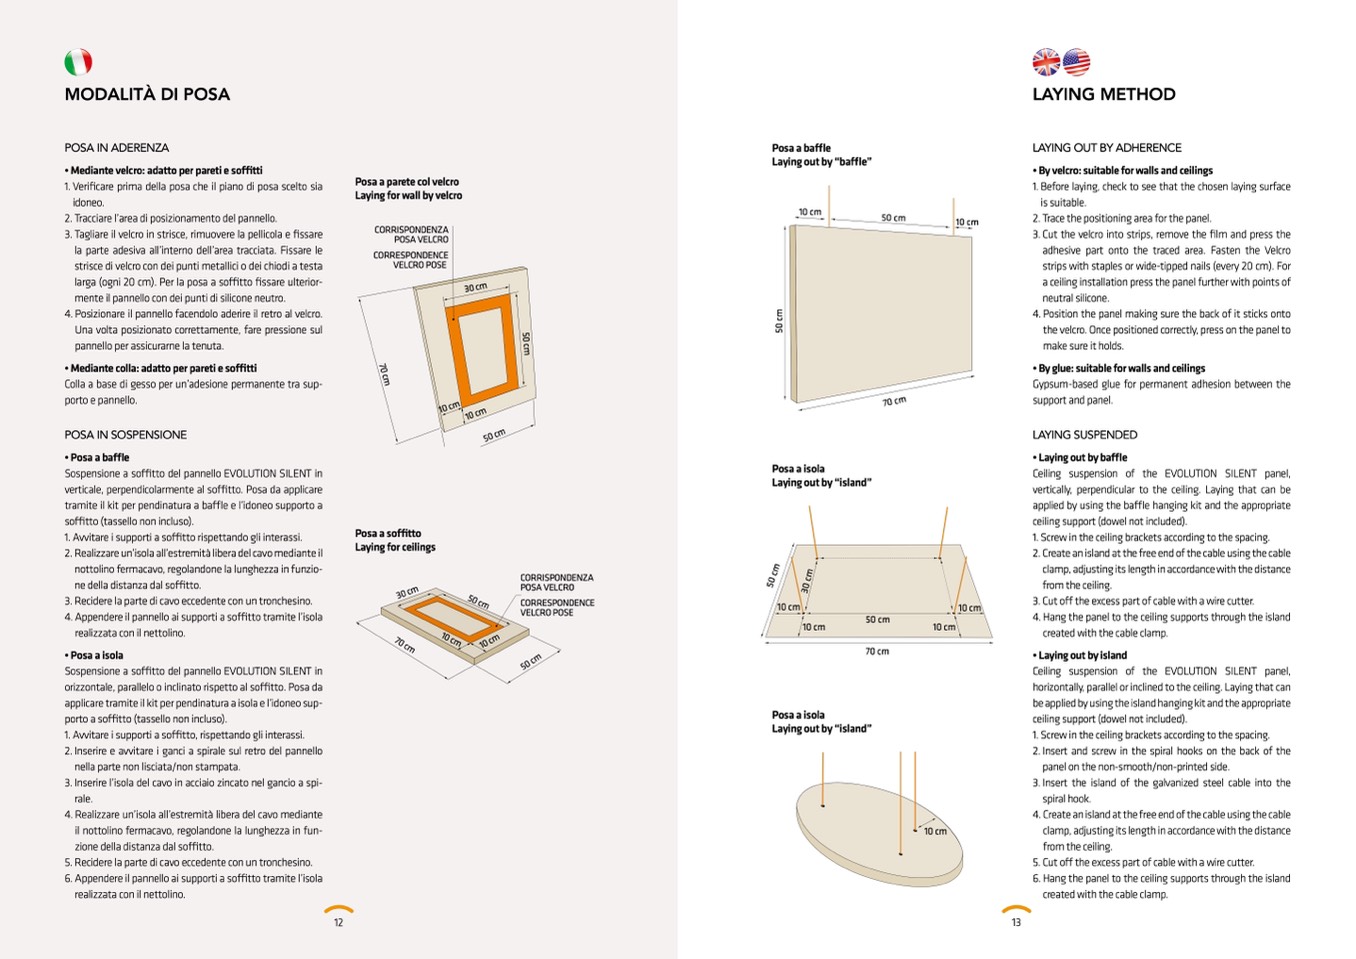
Posa a parete col velcro
Laying for wall by velcro
CORRISPONDENZA
POSA VELCRO
CORRESPONDENCE
VELCRO POSE
Posa a soffitto
Laying for ceilings
CORRISPONDENZA
POSA VELCRO
CORRESPONDENCE
VELCRO POSE
12
10 cm
10 cm
10 cm
50 cm
70 cm
10 cm
Posa a baffle
Laying out by “baffle”
10 cm
10 cm
LAYING METHOD
LAYING OUT BY ADHERENCE
• By velcro: suitable for walls and ceilings
1. Before laying, check to see that the chosen laying surface
is suitable.
2. Trace the positioning area for the panel.
3. Cut the velcro into strips, remove the film and press the
adhesive part onto the traced area. Fasten the Velcro
strips with staples or wide-tipped nails (every 20 cm). For
a ceiling installation press the panel further with points of
neutral silicone.
4. Position the panel making sure the back of it sticks onto
the velcro. Once positioned correctly, press on the panel to
make sure it holds.
• By glue: suitable for walls and ceilings
Gypsum-based glue for permanent adhesion between the
support and panel.
LAYING SUSPENDED
• Laying out by baffle
Ceiling suspension of the EVOLUTION SILENT panel,
vertically, perpendicular to the ceiling. Laying that can be
applied by using the baffle hanging kit and the appropriate
ceiling support (dowel not included).
1. Screw in the ceiling brackets according to the spacing.
2. Create an island at the free end of the cable using the cable
clamp, adjusting its length in accordance with the distance
from the ceiling.
10 cm
3. Cut off the excess part of cable with a wire cutter.
4. Hang the panel to the ceiling supports through the island
created with the cable clamp.
• Laying out by island
Ceiling suspension of the EVOLUTION SILENT panel,
horizontally, parallel or inclined to the ceiling. Laying that can
be applied by using the island hanging kit and the appropriate
ceiling support (dowel not included).
1. Screw in the ceiling brackets according to the spacing.
2. Insert and screw in the spiral hooks on the back of the
panel on the non-smooth/non-printed side.
3. Insert the island of the galvanized steel cable into the
spiral hook.
4. Create an island at the free end of the cable using the cable
Posa a isola
Laying out by “island”
10 cm
10 cm
10 cm
50 cm
70 cm
10 cm
Posa a isola
Laying out by “island”
10 cm
clamp, adjusting its length in accordance with the distance
from the ceiling.
5. Cut off the excess part of cable with a wire cutter.
6. Hang the panel to the ceiling supports through the island
created with the cable clamp.
13
50 cm
30 cm
5
0
c
m
5
0
c
m
7
0
c
m
70 cm
10 cm
10 cm
50 cm
30 cm
50 cm
10 cm
10 cm
70 cm
5
0
c
m
5
0
c
m
5
0
c
m
3
0
c
m
3
0
c
m

