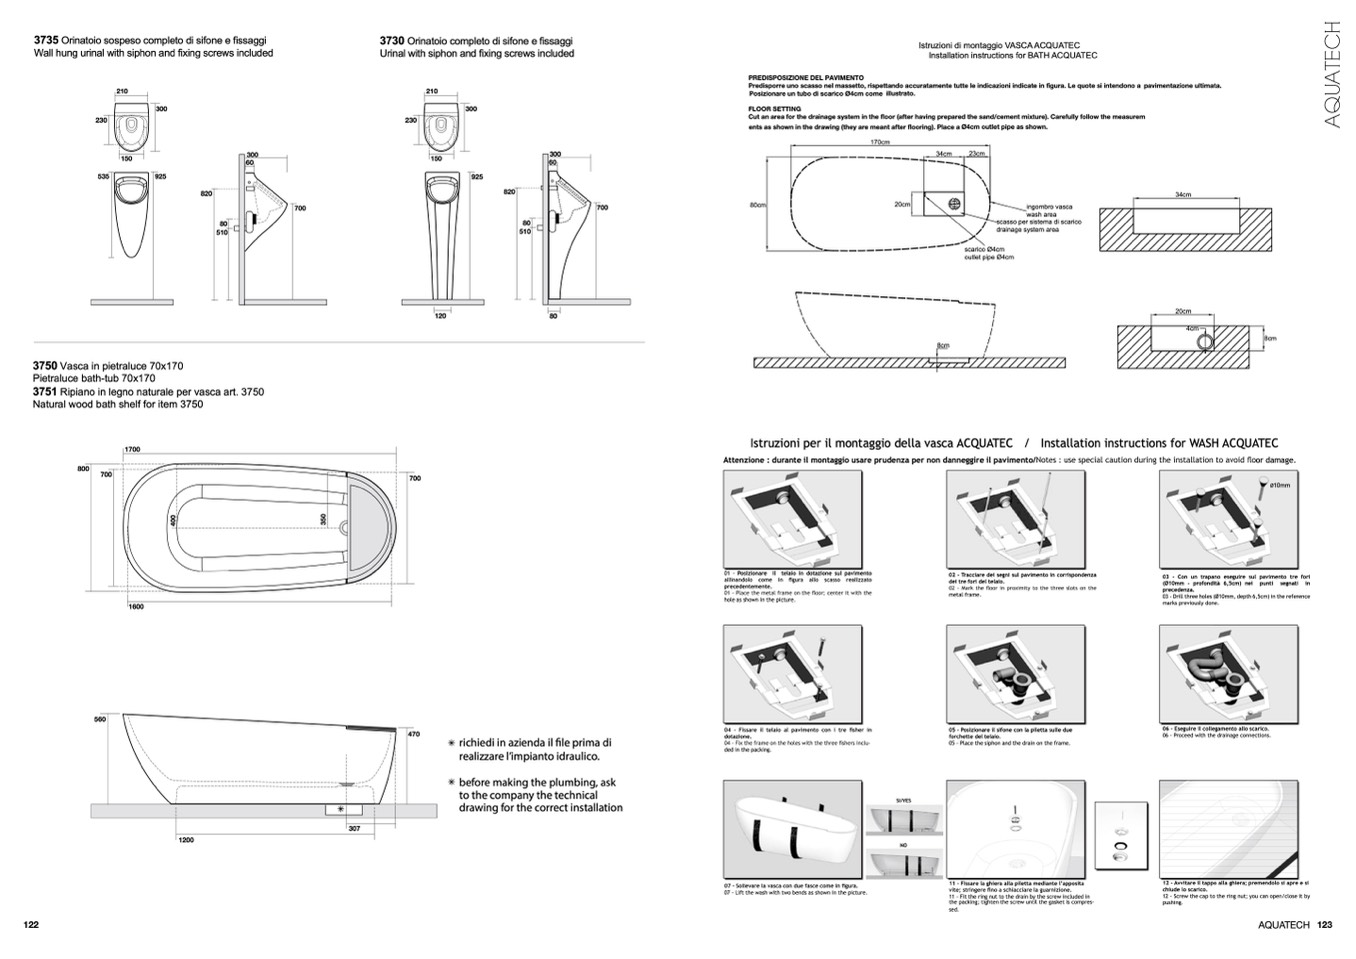
3735 Orinatoio sospeso completo di sifone e fissaggi
Wall hung urinal with siphon and fixing screws included
3730 Orinatoio completo di sifone e fissaggi
Urinal with siphon and fixing screws included
Istruzioni di montaggio VASCA ACQUATEC
Installation instructions for BATH ACQUATEC
PREDISPOSIZIONE DEL PAVIMENTO
Predisporre uno scasso nel massetto, rispettando accuratamente tutte le indicazioni indicate in figura. Le quote si intendono a pavimentazione ultimata.
Posizionare un tubo di scarico Ø4cm come illustrato.
230
535
230
210
150
210
300
925
300
FLOOR SETTING
Cut an area for the drainage system in the floor (after having prepared the sand/cement mixture). Carefully follow the measurem
ents as shown in the drawing (they are meant after flooring). Place a Ø4cm outlet pipe as shown.
820
34cm
20cm
4cm
300
60
80
510
150
300
60
925
820
120
80
34cm
23cm
700
700
80cm
20cm
ingombro vasca
wash area
scasso per sistema di scarico
drainage system area
80
510
170cm
scarico Ø4cm
outlet pipe Ø4cm
4
0
0
3
5
0
A
Q
U
A
T
E
C
H
122
AQUATECH 123
3750 Vasca in pietraluce 70x170
Pietraluce bath-tub 70x170
3751 Ripiano in legno naturale per vasca art. 3750
Natural wood bath shelf for item 3750
800
Attenzione : durante il montaggio usare prudenza per non danneggire il pavimento/
or damage.
Ø10mm
03 - Con un trapano eseguire sul pavimento tre fori
(Ø10mm - profondità 6,5cm) nei punti segnati in
precedenza.
03 - Drill three holes (Ø10mm, depth 6,5cm) in the reference
marks previously done.
06 - Eseguire il collegamento allo scarico.
06 - Proceed with the drainage connections.
12 - Avvitare il tappo alla ghiera; premendolo si apre e si
chiude lo scarico.
12 - Screw the cap to the ring nut; you can open/close it by
pushing.
560
700
1600
700
1700
Istruzioni per il montaggio della vasca ACQUATEC
/
Installation instructions for WASH ACQUATEC
1200
307
SI/YES
NO
470
richiedi in azienda il file prima di
realizzare l’impianto idraulico.
before making the plumbing, ask
to the company the technical
drawing for the correct installation
dotazione.
ded in the packing.
07 - Lift the wash with two bends as shown in the picture.
01 - Posizionare il telaio in dotazione sul pavimento
precedentemente.
hole as shown in the picture.
02 - Tracciare dei segni sul pavimento in corrispondenza
dei tre fori del telaio.
metal frame.
05 - Posizionare il sifone con la piletta sulle due
forchette del telaio.
05 - Place the siphon and the drain on the frame.
11 - Fissare la ghiera alla piletta mediante l’apposita
11 - Fit the ring nut to the drain by the screw included in
the packing; tighten the screw until the gasket is compres-
sed.
-
8cm
8cm

